HTML Development Tutorial
Import Javascript
First start by including the javascript file which can be downloaded from wearML_engine.js.
<html>
<head>
<script type="text/javascript" src="js/wearml_engine.js"></script>
</head>
<body>
</body>
</html>
Create input field
<form >
   First name: <input type="text" name="fname"/>
</form>
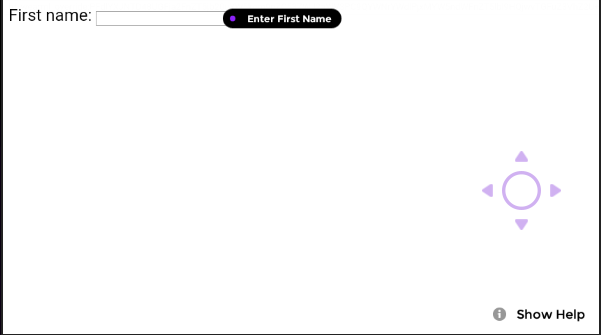
Now in order to speech enable this element we are going to add a custom attribute to the input element. By adding ‘data-wml-speech-command=”Enter First Name”’ we have now given this element the custom speech command of “Enter first name”. Now when the user says “Enter First Name” this element will be clicked.
Create CSS
In order for the user to see what the custom command is for this element we need to create a custom style. This changes the element from displaying a number to displaying text overlaid on the element.
<style>
     .overlay{
          --overlay_show_text:true;
          --overlay_show_number:false;
          --overlay_show_dot:true;
          --overlay_persists:true;
          --overlay_anchor_hv:"100,50";
     }
</style>
<form>
   First name: <input type="text" name="fname" data-wml-speech-command="Enter First Name" data-wml-style=".overlay"/>
</form>
We have now speech enabled this input field with a custom command and changed the overlay attributes so that we display this to the user.
Final HTML
<html>
<head>
<script type="text/javascript" src="js/wearml_engine.js"></script>
</head>
<style>
     .overlay{
          --overlay_show_text:true;
          --overlay_show_number:false;
          --overlay_show_dot:true;
          --overlay_persists:true;
          --overlay_anchor_hv:"100,50";
     } \
</style>
<body>
<form >
   First name: <input type="text" name="fname" data-wml-speech-command="Enter First Name" data-wml-style=".overlay"/>
</form>
</body>